Monday, October 31, 2011

Li See!

Are you excited? Only one day left until Release Day! Just wanted to thank Debi and our guest designer- Leanne for all their awesome samples. Hope they've inspired you to get going on some New Year's projects or at least keep them in the back of your mind until you are ready to start making them.

Although I'm not Chinese myself, my cousins are, and I spent a lot of time with them growing up. I remember receiving Li See (or Lai See) packets for Chinese New Year or any other occasion. Li see packets are red in color since its considered to be lucky and normally have gold because red and gold usually mean wealth. And don't quote me but I read somewhere that "Kung Hee Fat Choy" means Good Luck and Prosperity, or something to that effect. So with all that New Year's info in my brain, I thought it would be most appropriate to make my own li see packets featuring our new images!


First up is the Lion Dancers image. My favorite corner die cut is from a Sizzix border die set. This one looks so asian to me, so I incorporated it into this project. I also used my Hero Arts Prosperity kanji stamp since you give li see to give them wealth/prosperity right? I embossed the image using black embossing powder on my favorite gold cardstock. Look who's back!


And here's a close up of those dancers...


Next up are the firecracker kids... Since this image is pretty wide, I decided to turn the packet sideways so that they would fit better on the envelope. For this one, I kept it simple and cut the kids and firecracker string out. Used the label die by PTI and embossed it using my cuttlebug embossing folder for some texture. Added on Island Scrapbooking's new "Kung Hee Fat Choy" sentiment. Don't know if you can tell, but I also added some gold glitter stickles to make it look like the fire crackers were popping.
Here's some close ups of the girl and boy.


And my last li see packet features Kiyoko. I used another stamp from that Hero Arts set- this time used Happiness. Embossed the gold background strip using the same Cuttlebug Embossing folder as the previous packet. Decided to paper piece Kiyoko's kimono using washi paper. Cut out Kiyoko and added some gold stickles to her sparklers to make them sparkle.

Here's a close up of Kiyoko...


Hope you enjoyed my li see packets! Don't forget you can pick up your new stamps tomorrow (11/1/11)! And there's still time to enter into our blog candy giveaways. Go back to each introductory post for this release for your chance to win by 11:59 pm HST (tonight).

Sunday, October 30, 2011

Much Happiness!

Back with another card to share for our countdown till our Release #4 images are available. Did you get to check out our Guest Designer Leanne Poe's project? Well, we're continuing the fun today with more inspiration for you..


After working with so much red, black and gold, I thought I'd change it up a bit for my next card. Went with more gold, white and black colors this time around. Here's the front of the card- used my Hero Arts Happiness sentiment stamp again. It looked pretty plain, so I added in some gold cord and made my own tassel out of it. Then added in some ivory cherry blossoms from Wild Orchid Crafts. These are a staple in my collection- I use them on so many projects, but they are extra perfect for asian themed cards.


Oops, can you see the mistake I made on the inside? I'm sure you all can, but it was too late as I had already taped down the pop up portion. duh. Oh well, back to the card. I just got this pop up die and wanted to use it. I swear there's no more thinking needed to make pop ups anymore! This die has two pop up slits cut out of the base, so it was perfect for my firecracker kids. Since I needed to cut them out in order to pop them up, I had to figure out what to do with the firecrackers themselves. Ended up cutting them out and stringing them on some gold cord and hanging it from the washi paper. Added some gold stickles around the firecrackers to make it look like they are popping.


And here's a close up of the two kiddies. I paper pieced their clothes using some scrap washi and that gold cardstock. Her ribbons were colored using gold smooch.

Took this photo to just show you the die itself since its hard to tell from a front view photo. Now you can see that they are really popping out from the background.


So don't forget to check out Debi's and Leanne's projects for today! Back tomorrow with our final peek!

Saturday, October 29, 2011

New Year's Fun

Yay- its time to reveal our Guest Designer for this release! We were very lucky to get this "Groovy" gal to help us out at the last minute... Click here to see who we are talking about... I'm sure she'll have some fun surprises up her sleeve! Oh yes, and don't forget my CBFF Debi's blog to see what fun she's been working on..

And now for my card for today... This card took quite awhile to put together. I worked on the front but it looked kinda plain, so I distressed the edges using my weathered wood distress ink. It seemed to still lack something, so I finally decided to add a subtle hint of bling by stamping over the images with a Hero Arts swirls background cling stamp.. Yup, just stamped right over those kids faces. Then got my trusty gold mica powder and applied it all around the images so that the gold would not get on their faces. I like how it came out. I guess you can't really see it in this big photo, but I think you can tell on the close up photo.


The borders were punched with a MS crafts border punch on my favorite gold cardstock and then layered again with a red cardstock. Here's the close up... Oh yes, added in gold glitter stickles again to make it look like its popping.


And here's the inside of the card... Do you like my lion dance puppet? I think he needs a name... Maybe you can help me come up with one...


So the reason this card took forever was also because I could not for the life of me find my old old old fireworks stamp. I have a feeling I sold it at one of the rummage sales. So I checked out my local craft stores and couldn't find any there either. I guess I'm working off season. So I jumped online and found this awesome fireworks stamp by Stampendous. Its a large cling stamp- it only fit on my largest acrylic block, but it was good to fill up the black space behind the dancers. Because most of my card was made and I was just waiting for this stamp to arrive, I had a hard time stamping the fireworks. Some of the image didn't stamp well since it was going on several layers, so I ended up filling in using my Versamark pen. This was the first time I used that pen and it was just what I needed to fill in the gaps.

After stamping the fireworks with Versamark, I applied some gold glitter embossing powder and red glitter embossing powder to the fireworks. To achieve the effect of multi colored fireworks, I would only apply the glitter to a portion of the fireworks and tap off the excess, then apply the next color, etc... Then it was embossing time... If you've ever tried to emboss glitter embossing powder, its very tricky. The look doesn't change much like regular embossing powder does, so you really have to watch and make sure you are not burning the paper. I hold it up to the light while I'm embossing and you can kinda see some of the glitter glistening every once in awhile- that's my cue to move my gun around to another section.


I used the Sizzix scallop circle pop up die to make the dancers pop out. These dies make pop up cards a breeze! Finished off the card with a gold layered on red "Kung Hee Fat Choy" sentiment by Island Scrapbooking.

Here's a close up of the dancers. I dont' think you can tell, but I put some white fun flock to the lion's furry parts (around his face). I also used my favorite gold smooch to add some gold touch ups to his costume.


Phew! That was a long post! Now you know why this card took me so long to make! Plus it didn't help that I made it backwards!! ha ha ha! Oh well, hopefully you learn from my mistakes!

Don't forget to check out our Guest DT and Debi's posts for more inspiration!

Thursday, October 27, 2011

Sparkly Kiyoko!

Everyone's played with sparklers before right? Well, when I was young, I was chicken..(I mentioned that in my last post) and did not like those jumping jacks since they always seem to attack me! So the safest thing for me to play with was sparklers. Sad times yah? It makes me happy that my daughter is fearless and plays with whatever is available, from when she was young. Sparklers are very boring for her, but I still enjoy them!


Kiyoko is my mom-in-law's japanese name. We always have New Years' at Grandma's house, even when I was young, it was always at my Grandma's, so I thought it was fitting to name this image after my daughter's grandma. New Year's in Hilo is very special for me. Not only is it New Years, but New Year's Eve is also my husband's birthday, so many of our friends and family stop by my mother-in-laws house to wish him Happy Birthday. Even those that we do not see very often seem to make it for a little while to say hello. Plus Hilo is FREEZING around New Year's time, so everyone is bundled up in the cold, playing firecrackers. New Year's will be very dull once we can't buy firecrackers anymore! I'm sure the other New Year's traditions will be remembered, but oh how we will miss that smell of smoke on New Year's Eve!


Here's the card I made using Kiyoko... I must admit that this is the second card that I made for this introductory post. The first one was made in a rush and I just wasn't happy about it, so I decided to try again. This time I made it into a shaker card! I haven't made one of these in ages because I hate the foam tape and what it does to my scissors. Well, I lucked out this past weekend and found a roll of thin foam tape at a local craft store on Oahu while visiting. That was a good find! Made making my shaker card oh so easy! I cut the circles from my new Sizzix wafer thin dies that are larger than my Spellbinder set and a great size for Sister Stamps images.


I guess the stickles I used on the sparkers wasn't quite dry yet, so all the microbeads were sticking to it. The frame was made using my MS punch set on my favorite gold cardstock. Topped it off with some red cherry blossoms by Wild Orchid Crafts. Here's a close up of Kiyoko...

I made this into an easel card, so here's what it looks like when the card is opened. I chose one of my new labels from the Labels #3 Spellbinder set. It had an asian appeal to me, so I thought it matched. The sentiment is from a Hero Arts set that has a great variety of sentiments for all occasions.


That wraps up our introductory posts for this release! Check back soon for more samples of Release #4 images and our Guest Designer reveal. Oh! And don't forget to post a comment on THIS POST (follow rules on Firecracker introductory post) and tell me where you go to celebrate New Year's.

Supplies:
  • Kiyoko image- Sister Stamps
  • Cherry blossoms- Wild Orchid Crafts
  • Microbeads- MS Crafts
  • Punches- MS Crafts
  • Stickles
  • Smooch
  • Labels #3 die- Spellbinders
  • Circle dies- Sizzix
  • Oval die- Spellbinders
  • New Years Sentiment- Hero Arts
  • Swirl background stamp- Hero Arts
  • Gold mica powder
  • Foam tape
  • Cardstock- Bazzil

Wednesday, October 26, 2011

Lion Dancing!

Welcome to our second day of introductions for Release #4! Today I have a pop up card to share with you using our new Lion Dancers image. We felt that the crafting world was lacking Chinese New Year images and what is more Chinese New Year that a Lion Dance??? But this image is not only for Chinese New Year... I know we often celebrate special occasions with lion dances like weddings, baby showers, etc., so you might find that this image comes in handy for other special occasions too.

I remember being scared of the lion when I was young, but I was always a scaredy cat... even now. But now that I'm older, I love watching lion dances! I love how everyone gets so happy when they see the lion approaching and how kids will run up to the lion to give it money. Businesses also welcome the lion as it brings good luck and fortune. Normally an offering is made in a li see (red envelope) along with some lettuce and fruit/veggies. In Hawaii, we also incorporate Lion Dances at weddings and baby luau's where the bridal couple/baby & parents will give the lion an offering which is suspended from a pole.


On to my card... First, here's the front of the card. I guess I was a little tired of using red and gold and decided to change it up with some purple.


Here's what the card looks like when its opened. I added in two red pockets to hold the good luck money that is normally given for New Year's. It is normally given in red li see packets, so I thought I'd better make them red. The die used to suspend pop out the dancers is an old Sizzix XL pop up die.


And here's a close up of the dancers. See how they stand up in the card?


Don't forget to check in tomorrow for our last introduction. And don't forget to leave a post on THIS POST to be eligible to win this stamp. See the Firecracker kids introductory post from yesterday for the other requirements to be eligible to win. Oh, and this time tell me about your favorite lion dance memory. Good Luck!

Tuesday, October 25, 2011

Kung Hee Fat Choy!

Happy New Year! Or at least start getting ready for the new year! Today marks the beginning of our introductory posts for our Release #4 images! Yay! First up are the Firecracker kids. I really really wanted an image with firecrackers and sis really delivered with this stamp. In Hawaii, New Years is a big thing, no matter what race you are and fireworks are a BIG part of it. But now that the laws have changed, I'm sure the next generation won't know all the fun we had growing up! Poor things yah?


Since these images are more Chinese, I went with my favorite red, black and gold color scheme. This washi paper reminded me of firecracker paper, so I thought it matched well. Also used one of my new favorite Spellbinder dies to mount the kids on. This is actually a cut down version of the stamp. I decided to cut out the kids and firecracker string, but the stamp image also contains bursting fire crackers and paper in between the kids. Since I had cut out the paper and sparks, I decided to make my own sparks using gold glitter stickles. Oh yah, and can you tell I tried out Amy's Superhero hair technique? Thanks Mama for the blue Copic!


And do you likey the inside of the card? By special request, Island Scrapbooking now makes these "Kung Hee Fat Choy" sentiments. They work really well with these new year's images, don't 'cha think?


Oh yes, can't forget the other stuff I used... embossing folder is by Cuttlebug- came in a set with other asian embossing folders. And the die used behind the words is by Papertrey ink.

Are you ready to enter to win some candy? OK here's the rules again:

  1. Follow this blog publicly (we are not able to confirm if you follow privately and you will not be eligible to enter).
  2. Tell everyone about our new releases on your blog (appreciated but not required to enter).
  3. Tell us what your favorite New Year's memory is!
  4. Leave a comment on THIS POST to be eligible for the Firecracker stamp. Please post your comment by 10/31/11 at 11:59pm HST.

Monday, October 24, 2011

Release #4 Images Revealed...

Wow- can you believe how fast October is flying by? It's already time for our reveal of the Release #4 images! Yes, yes, we have some New Year's images coming up on 11/1, which should give you plenty of time to create all those New Year's projects. I have some special projects to share with you this week so check back to see all the fun. Plus I have another special guest designer helping us out this month, so stay tuned to find out who it is...


Monday, October 17, 2011

Merry Christmas!

Just wanted to share another card using the holiday stamps before we start getting into the New Year's ones. I bought this Cherry Lynn doily die in Honolulu and wanted to use it on something. You'll need to run it through your machine more than once but I'd say the results are worth it. I love the intricate lines it forms- makes it really look like a doily! Had this colored up Setsuna waiting on my desk to be used, so I added him the front as the focal point.


Here's a close up of St. Nick...


And here's the inside of the card... I FINALLY used my Sizzix 3-D tree die I got last year after Christmas. It was really easy to put together and the results are awesome. Now I wish I got the snowman one too. I placed Yuki next to the tree by attaching her to the tree itself.


And finished it off with a sentiment. Layered the Merry Christmas (Island Scrapbooking Laser Cut) onto some Spellbinder labels that I used as tags. Because it looked rather plain, I added the ribbon and holly branch.


Have a great week!

Wednesday, October 12, 2011

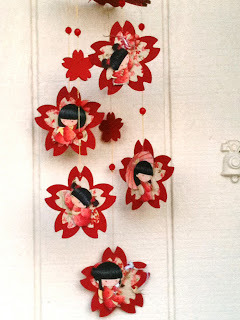
Sister Stamps Mobile

When I got my hands on these awesome Sakura dies by Lifestyle Crafts (formerly Quickutz), I had a vision of this project. Its amazing how sometimes the image in your mind actually comes to life (and sometimes it totally bombs!). Anyway, since the sakura die has 5 petals, I thought I could hang something from each petal.

Here's the result...


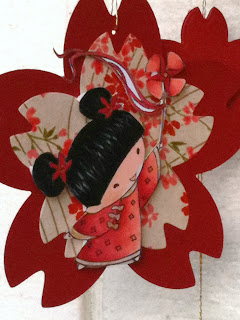
My only concern was stability. Because paper is so flimsy, I was worried on how to stabilize the sakura so that it wouldn't bend or curl. Finally I saw this tutorial on the Papertrey ink blog that explains how to layer chipboard. Since the dies are wafer dies, they won't cut through thick chipboard, but they cut fine through my old cereal boxes. So I harvested 2 boxes from our recent shopping trip and they worked perfectly! After cutting several layers, I adhered them together and then cut out a red sakura for each side. Then smaller sized sakura in washi paper to add to the red sakura.

After adding each girl. I decided to add some beads to help with balancing out the mobile. In between the longer strings, I added in the smallest Sakura die cut. I just love how it turned out!

Here's close ups of each girl.


So I hope you enjoyed this project! If you were inspired to make a mobile, let me know so I can check it out!

Washi paper- Hanko designs
Sakura dies- Lifestyle Crafts

Tuesday, October 11, 2011

Dropping You A Line...

Included in my stack of goodies was this card... To thank Aunty for all her help, I had given her a gift card to one of our favorite stores... Vera Bradley! She sent me this thank you to tell me how much she loved her new bag. I gotta say that I love how she colored up that bow! I've been too intimidated or maybe I just forget to try to blend using 2 different colors. I think she did a great job. And I also love the layout of this card. So clever to have Yoko's line hold the sentiment.


Here's a close up of Yoko-chan.


Thanks so much Aunty! I love this card!

Monday, October 10, 2011

Friendship is Precious

Isn't this bridge just amazing!? I just love it when cardmakers incorporate a scene into their cards. Being that we are such a new company, we don't have accessory images (yet) and there aren't a lot of asian themed images we can use. So what do we do? Improvise! Here Aunty Jan used a Colluzze Cutter to make her bridge. I'm not familiar with that product, but I sure what to learn how this was done? I'm guessing you could probably get a similar result by using your nestibilities and some "i"'s or exclamation marks!

Here's a close up of Yoko.. I just love her kimono coloring!


The sentiment on this card "Friendship is Precious" is acutally a Hero Arts stamp. Thanks for all the great cards Aunty!

Saturday, October 8, 2011

New Yuki Winner...

Hey Yuki fans... it appears our winner didn't respond, so I'm pulling a new winner for the Yuki stamp. The new winner is:

**CrEaTiNgWiThAlOhA** said...

How adorable is she....My fav. present was the dolls....christmas will be my fav. holiday it is when i am a year older....TFS...liann

Congratulations Liann! Email me at sisterstampsllc@gmail.com with your mailing address by 10/12/11. Thanks!

Friday, October 7, 2011

Birthday Ayako

I gotta admit, when I saw this ek success punch on the shelf, I didn't like it. I thought it was busy and I'd probably never use it. But then Aunty sends me this card and I love it! Now I gotta go find me that punch! The texture from the punch really added something to the background of this card. I love how she punched gold and layered it onto red cardstock.

Oh and did I mention those little flowers? I believe they are from a hand punch and she added in stickles for the middle.


The sentiment is by Amuse Art Stamps. Love this card!

Thursday, October 6, 2011

Just For You

The last time I went home, Aunty asked me to teach her how to blend using Copics. So we had a play date and I taught her what I know (which isn't much). When I saw this card I was so impressed with her coloring! I love how she colored up Nobu's kimono and hair. I think she did a great job!
We saw this embossing folder while craft shopping together. It didn't catch my eye, but it sure caught Aunty's and now I know why! That folder sure made a cute background for Nobu's playful spirit! And here's a close up of Nobu...


BTW, the sentiment is by Hero Arts and the embossing folder by Darice. Thanks Aunty for this cute sample!

Wednesday, October 5, 2011

More Miyono

Hi There! Did you get a chance to pick up your Release #3 stamps yet? Well, as I was hard at work on Release #3, Aunty Jan sent me a box of samples of Release #2 images before she went on her trip.

I love this card featuring Miyono. It's too bad my camera didn't pick up those tiny flowers on the left. They are really cute! Aunty says they are by Orange Closet, guess I'd better find me some! The background she used was origami paper and she topped it off with baker's twine by the Twinery.


Here's a close up of Miyono...

Check in soon for more samples of Release #2 by Aunty!

Tuesday, October 4, 2011

Blog Candy Winner?

Paging Kitty, paging Kitty... we have not heard from you yet to claim your blog candy prize. Please email me at sisterstampsllc@gmail.com by Friday, 10/7. If I do not hear from you by then, I will pick another name. Thanks!

The Joy of Setsuna

So you already saw my Yuki joy fold card right? Well, it was so fun making the joy fold card, that I decided to do it again with Setsuna. I made a bunch of these cards and sent to some of the retailers as a shop sample. I love how this kind of card allows you to use a bunch of coordinating patterned paper together.


Be back soon to share some cards made by Aunty Jan using our 2nd Release images.