Saturday, August 31, 2013

Advent Calendar

Can you believe it?  It's almost release day!  To celebrate, I have a big project to share with you today, but first I want to thank all of our hard working design team members for their great projects!  You guys are the best!  How about a round of applause for Eva, Linda, Debi and our guest designer Steph!  Thank you ladies!  And don't forget to check out Steph's and Linda's You Tube Channels for more fun!

So I told you about a big project right?


It's an advent calendar!  I know it's hard to see but I wanted to give you a view of the whole project before I share with you the details.  I must say, it took me a few days to complete this calendar.  I found a bunch of red gingham paper bags in my stash and thought they would be really cute to use in a project.  Since I had so many of them, I thought it woudl be great to use them to hold goodies or an activity to do to help countdown to Christmas!   My daughter loves her advent calendar that my mom bought for her when she was just a baby.  My mom used to put money in it, but I think my daughter cares more about taking an ornament out each day to put on this wooden tree.  She's very good about remembering to do it too. I, on the other hand would always forget to do mine as a child. I guess some things never change.

So to make the calendar, I cut out all the numbers using a Papertrey Ink numbers set.  It's so hard to find large numbers and letters, so I was thrilled to find this large size on their site.   After cutting out all the numbers, I punched out 24 circles and 24 scallop circles to mount the numbers to.  Then I cut a 3/4" band to go around each bag.   After adhering everything down, I folded over the top of the bag down towards the number.


To hang each bag to the ribbon, I decorated 24 clothespins using designer paper and double stick tape. I didn't want to have images on each clothespin, so for those that did not have an image, I just went through my stash and found red, white, and green buttons to decorate the fronts.

On certain bags, I added some of our new Christmas images and some old favorites.  Shown above is our new reindeer image.  And right below is Setsuna.  He decided to pay us a visit in this post.


Aaah, my favorite little girl... it's Yuki!


And gracing us with his presence on this next bag is Minoru.


Last but not least is our crane image.  I positioned the image at an angle so that the crane looked like it was taking off.


Well, hope you enjoyed all of our new releases!  Eh... no forget to enter to win our blog candies on each introductory post! Bwahahahahaha!
Friday, August 30, 2013

Reindeer In Action

Are you in the Christmasy mood yet?  I gotta admit, this release has been putting me into holiday mode.  I've been daydreaming of craft fair projects, Xmas classes, etc.  Maybe I'll get an early start this year? Well, one can always hope right?

Before I get into my next project, I just wanted to make sure you guys are visiting our design team!  Don't forget to stop by Debi's, Eva's, and Linda's blogs to see how they are playing with our new images!  And don't forget our guest designer Steph!  (Hi Steph!)  She is one sweet crafty chick!  I just love her shabby chic style and how she can alter just about anything!  She also has a You Tube channel that is a must see.  Go check her's and Linda's channel out!

I've always been a sucker for cards that move.  Whether it be a pop up card, spinner, shaker, anything that had some kind of movement has always intrigued me. I've always yearned to learn how to make it and would study tutorials that I would find online.  I guess die companies have cracked the code and have made making cards that move so much easier!  Instead of spending hours upon hours trying to figure it out, all you need to do is cut the paper using a die designed for movement and you are in business!

More and more I am finding that I've been pulling out this Sizzix Pop 'n Cuts die.  What I love about it is the flexibility to change what actually pops up!   Here's the front of the card.  I used the Noel pop in cut insert, but didn't use it in the way you were supposed to.  Instead, I just cut it out of gold cardstock and cut the word out and rounded some of he edges of the letters.  It's hard to see, but I also used a memory box die which looks like a snowflake flourish.  Topped it off with a white poinsettia by Petaloo.


Here's what you see when you open up the card.  Yay!  I just used the insert that came with the pop 'n cut base.  It was easier to mount the reindeer image onto that base than to some of the other inserts.  Above the girls I made a banner out of gold washi tape and just cut the points free hand.  


But wait, there's more!  I know you can't tell from still photos (guess I should consider making You Tube videos too) but behind the girls is an action wobbler!  So when you open up the card, the girls start wiggling.  Or you can make them wiggle just by touching them.  I thought it was a fun touch since the reindeer is in an action shot.


Here's a side view of the image mounted so you can see what I'm talking about.  Below the image, I cut some gold cardstock and added some ivory cardstock over it so that you can write a greeting. I added another gold snowflake flourish and white poinsetta.

'

Hope you are enjoying the previews so far. I have one more project to share with you tomorrow.  Please stop by to check it out!

Thursday, August 29, 2013

Minoru Tags

Now that the introductions are done, I'm super excited to introduce our guest designer for this release!  She is another Hawaii girl that has a blog and You Tube channel that you need to check out! 

And back again to inspire you are Eva, Linda, and Debi to share their Christmas projects with you! Please give these ladies some sisterly love!

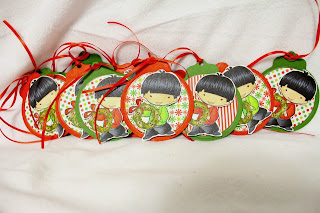
On to my project share....One can not have enough Christmas tags right?  Well, I decided to make a bunch featuring Minoru to give to the retailers as store samples.  I made a few extra for myself!  Used a Papertrey Ink tag die that reminded me of an ornament.  Cut another circle using my Sizzix thinlet dies using various Doodlebug patterned paper.  I love how Doodelbug Designs are whimsical like our stamps!


Look how many I made!


I think I need to make a few more tags so that I'll be prepared for the holidays!   I'm starting to get in the Christmas mood now!  Don't forget to check out everyone's blogs and You Tube channels!

Wednesday, August 28, 2013

Reindeer Games...

Aaaahh, down to the last introduction!  I have another story to share here...

When my sister sent me this image, we debated back and forth on it.  I liked the concept, but wanted the reindeer to look more squishy instead of long and lean as normal reindeer look.  Unfortunately, putting the two girls on the reindeer made the reindeer look huge, but I think she managed to get the face to look kawaii while still being able to add the two girls on for the ride.

We had decided that if we weren't totally happy with it, we wouldn't release it.  Fast forward a year later, I was skyping with my sis and she was excited to show me all the crafts she's been working on. One of which was using the reindeer image.  Man, she sure made it look cute as an ornament!  So we talked some more and decided that we'd release it during the next holiday season.  Hope we made the right decision and that you can now enjoy it too.

Here's the journaling card I came up with this time.  I wanted to do something a little different this time.  Instead of using patterned paper like I normally do, i decided to go a little more artsy fartsy and make my own background.  It's hard to see in this photo, but I stamped and colored the reindeer image on cardstock.  Then I used some Spun Sugar Distress Ink with my water brush and painted on a light streak of pink in front of and under the reindeer.  After that dried, I stamped the Joy sentiment using an old Hero Arts set.  It still needed something, so I found some of my ice stickles and made more streaks by the legs of the reindeer and under the words.  I think it added just the right touch without taking anything away from the image.


I hope you have enjoyed my journaling card projects! I think I'm going to continue to make more with future releases.

So, do you want a chance to win this reindeer image?  If so, just leave a comment on THIS POST by 08/31/13 11:59HST.

Please join us tomorrow as our design team will feature our new images and we will reveal who our guest designer is!

Tuesday, August 27, 2013

Sleigh Bells Ring...

OK I have to admit something to you... two years ago when I was visiting family, I was at a house with no internet, so I was reading my email on my phone late at night after the kids went to bed.  My husband didn't fly up with us, so I was crusing by myself.  This was just before the first release of Sister Stamps, so I had been talking to my sister about image ideas.  She must've been inspired, cause all of a sudden she started sending me a bunch of images.  When I opened the email with the Sleigh image, I actually spoke out loud... "Oh My God!"  I was so excited to talk to someone, but everyone had gone to bed!  After I picked my jaw off the floor, I called my husband, but he couldn't share my joy cause he couldn't see the image.  And now I can finally share it with you!

I have to say that this is one of my FAVORITE images.  Hope you all like it too!


Decided to make more journaling cards to be used in my scrapbooks.  Can't wait to start using them.. just need to print up my photos!  I found this starry paper the other day (sorry I can't find the company name), and thought it was the perfect background for a sleigh ride.  I just love how the crane replaces the reindeer.  I can't help but wonder if that's how Santa's sleigh is pulled in Japan?  After coloring up the sleigh image, I fussy cut it out and mounted it on the starry background.  Mounted it onto silver mirrored cardstock and finished it off with an Island Scrapbooking sentiment.

I hope you enjoy this image as much as I do!  If you would like a chance to win this stamp- just follow the details below and leave a comment on THIS POST by 08/31/13 11:59pm HST.  Good Luck!

Monday, August 26, 2013

Meet Minoru...

Welcome to the first day of introductions for our new Christmas images!  Woo Hoo!  While brainstorming ideas for more images 2 years ago, I asked my sister for some holiday stuff.  I guess she got inspired, so she ended up sending me email after email with more and more fun stuff.  I fell in love with Setsuna (Santa), Shimo-san (snowman), and Yuki (stocking) images, so I released those first. Minoru was one of images she had also provided, but I thought I'd save him for the next holiday go around.  I love that she made him holding a wreath!

Minoru is named after my husband's cousin.  The last couple of times he came to visit he made friends with Akemi.  She loves hanging out with him!  Hopefully we get to see him again when we go visit the family in Vegas later this year.  Something about this image really reminds me of him- I think it might be the haircut...

Before I get into my project, just wanted to share some thoughts on my scrapbooking journey...
Since I'm starting to get back into scrapbooking, I thought I'd make myself some journaling cards to use in my scrapbook.  I remember when scrapbooking was HUGE!  I guess what happened (for me anyway) is that I started stamping first, then went from cardmaking to scrapbooking... then digital scrapbooking was born and some people stopped scrapping (I never totally got into the digital craze).. Then creating sophisticated layouts became intimidating and difficult, which lead to unfinished scrapbooks.  But the need to document our lives lives on, and the need to make perfect layouts no longer exist.  We can distress, smash, journal, add drawings, mixed media or keep it very very simple.  No more rules, no more competition, just documentation!  I love that freedom!

The best part is that you can still use your stamps!  Love that I can make my own journaling cards and can incorporate a lot of our images.  Makes me feel like I'm still being creative even though the scrapbooks themselves have become simplistic.  So I'll be sharing my journaling cards during my introductory posts... hoping they inspire you to start scrapbooking too!

My first journaling card features Minoru.  I went with a 3x4 sized card using some scrap Doodlebug Designs paper from last year's line.  I just punched out a red scallop circle for the background to make Minoru pop.  Kept it very simple.  I can't wait to use it on my Christmas page this year!


Do you want a chance to win Minoru? Here's all you have to do:

1)  Leave a comment on THIS POST by 08/31/13 11:59pm HST; and
2)  Tell me if you scrapbook or not.  If you do, do you incorporate stamps into your albums?


Sunday, August 25, 2013

Jingle bells..

WHAT?  Christmas stuff already?  Yes, yes, it's true... our next release are Christmas images!  It's been 2 years since we first released some Christmas stamps, so I'm pretty excited to share these with you now.  You won't believe it, but I've been sitting on these images for 2 years!  Without further adieu, check it out!

Be back tomorrow to start up the intros.. Ja Mata!

Thursday, August 1, 2013

It's Release Day!

We made it through another set of previews!   Can you believe its August already?  That only means one thing... It's release day!  Time to go get your new images!  But wait... if you entered to win our blog candies, you might want to read here first:

Dolphin set:  Jan Castle
Octopus set:  Patty
Turtle set:  Janine
Ox:  Leanne
Tiger:  Cris

Yay! Congratulations to the winners!!  Please email me at sisterstampsllc@gmail.com with your address so I can mail these off to you. Please note that I will be off island, so these won't ship till next week.  Thanks for playing!

AND... I have another teaser to spark your interest...


Until next time!